Looking to build a solvent trap suppressor? Skip the high prices and long wait times associated with purchasing suppressors. Instead, opt for a legal and cost-effective alternative: building your own solvent trap suppressor.
Table of Contents
How a solvent trap suppressor Works
The purpose of baffles in a suppressor is to decelerate the gas, resulting in turbulence and decreased velocity. The tube and end caps play a crucial role in confining the gas, preventing the escape of both explosion and sound.
Given the substantial amount of energy that suppressors must contain, it is essential to utilize high-quality alloys such as stainless steel, high-grade aluminum, and titanium. These alloys are capable of effectively converting a significant amount of energy into heat while maintaining durability and performance.
Are solvent traps legal?

Indeed, the ATF has categorized solvent traps as “firearm accessories,” which implies that they are not subject to regulation under federal gun laws. However, it is crucial to note that if a solvent trap is modified with drilled cups, it may be deemed a silencer or suppressor by the ATF. Engaging in such modifications can result in severe legal consequences. It is important to comply with all relevant laws and regulations to avoid any potential trouble.
Do I need an FFL or paperwork to buy a solvent trap?
Due to the ATF’s classification of solvent traps as accessories, purchasing a solvent trap kit is similar to buying any other commercial product online. There are no legal distinctions or restrictions that set it apart from other items available for purchase.
Do I need paperwork to Build a solvent trap Suppressor?
Yes. A suppressor is a controlled item also an NFA (National Firearms Act) item. Federal law requires that anyone who does so still register the device, and submit it to a background check before construction.
How to Build a Solvent Trap Suppressor
Drilling The Cups
Ensuring the precise diameter and location of the drilled holes is of utmost importance when building a suppressor. If the holes are too wide, the suppressor will not effectively capture and dissipate the pressure and sound. Conversely, if the holes are too small, there is a risk of the bullet hitting the baffle, potentially causing damage or injury.
To achieve the necessary precision, it is crucial to drill the holes with tight tolerances. This is particularly important to avoid dangerous situations where the suppressor could explode if the first bullet strikes a baffle or ruptures the tube. Machinists and hobbyists often rely on tools like lathes or drill presses to achieve precision. However, even without such tools, a machining jig can be used. Many solvent trap manufacturers offer machining jigs alongside their various cones, facilitating the creation of precisely machined holes.
Clipping The Baffles
Clipping refers to the process of creating small ports in the pass-through holes, which enhances turbulence and improves the overall performance of the suppressor.
To ensure the safety and effectiveness of the baffles you drill for your homemade suppressor, a drilling jig is essential. This jig consists of a small centering fixture that can be clamped in a vise, along with a plate equipped with a drill bushing for the cones’ drill bit. By utilizing this jig setup, you can easily locate the center of the cone or cup and drill the pass-through hole with perfect alignment. Both a drill press and a hand drill can be used with a jig that has a drill bushing. Simply secure the cup and jig assembly together with screws, and then proceed to drill through the baffle using the appropriate-sized drill bit.
Typically, the solvent trap drilling jig plate is fastened to the baffle jig using Allen-head bolts. Once securely mounted in a vise, you can effortlessly drill through the baffle’s drill bushing using either a hand drill or a drill press.


Since the jig controls the bit’s position, all you need to do is control the drill while each hole is completed.
Drilling The Baffles: Drill Bit Sizes vs. Caliber
Use the bit size list below to drill the appropriate diameter pass-through holes in your solvent trap’s cones or cups. If using your suppressor on various weapons (like a 5.56 NATO rifle and a 300 BLK pistol), always pick the bit size based on the largest caliber your suppressor will be used on.
• 22-Cal: 9/32″
⚫.30-Cal: 3/8″
⚫9mm: 27/64″
⚫ .40 S&W: 15/32″
⚫.45 ACP: 33/64″
⚫.450 Bush: 17/32″
⚫.458 SOCOM: 17/32″
⚫6.5 Grendel: 21/64″
⚫ 6.5 Creedmoor: 21/64″
⚫.338 Lapua: 13/32″
⚫.50 Beowulf: 9/16″
Before proceeding to drill holes into solvent trap cups, it is crucial to determine the optimal design that suits your chosen cartridge. The specific ammunition you aim to suppress, such as centerfire or rimfire, supersonic or subsonic, and rifle or handgun rounds, will greatly influence the selection of cones or cups for your suppressor. Let’s explore the common types of internals frequently available for solvent traps and their respective applications.
Clipping The Baffles
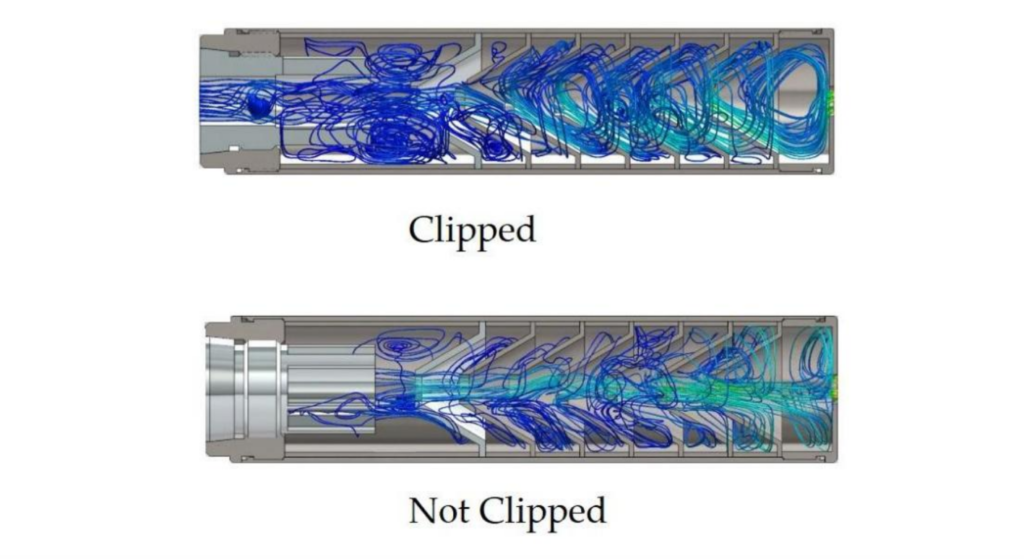
Unfortunately, drilling the pass-through holes into your cones or cups, turning them into baffles with spacers, and stacking them in your tube isn’t going to provide the best sound reduction. A best practice that is effectively required to achieve the most decibel reduction, called “clipping”, must be done to each drilled baffle to ensure sufficient turbulence and disruption of laminar flow is achieved to reduce pressure and sound as much as possible. The illustration below shows how clipped baffles perform compared to un-clipped baffles:


The purpose of the clips on each baffle is to induce increased turbulence by redirecting gases away from the pass-through hole of the next baffle. This elongates the duration the gas remains inside the suppressor before being released.
Fortunately, achieving an effective clip on the most commonly used cones can be accomplished with basic tools. Simply cut half of the pass-through hole horizontally at a height ranging from one-third to one-half the diameter of the hole. The final cut should resemble the following illustration:
|
|
______|_____
|
|
DISCLAIMER: It is essential to comply with all local, state, and federal laws and regulations. The information provided here is for educational purposes only. If uncertain or when considering any firearm modifications, consult with an attorney and/or the ATF for official guidance.

